
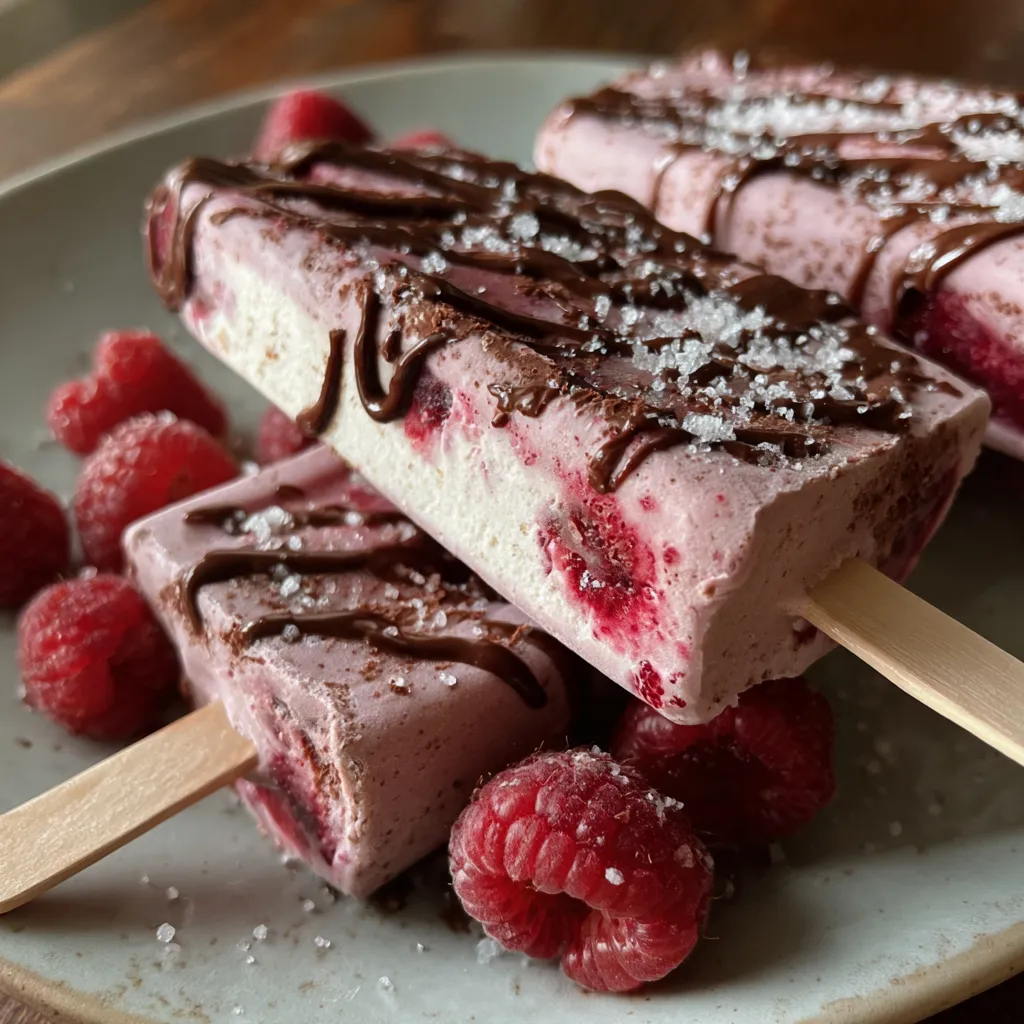
Chocolate Raspberry Frozen Yogurt Pops blend creamy Greek yogurt, deep chocolate, and vibrant raspberry into a gorgeously marbled treat that bursts with sweet-tart flavor and cool creaminess. Silky chocolate yogurt layers swirl with jewel-like raspberry puree, giving each popsicle a playful magenta and mocha look. Beginner-friendly and healthy, these icy delights are perfect for hot afternoons or guilt-free dessert moments. Grab your molds and let’s dive into this fun, homemade popsicle adventure together!
Key Ingredients
Gather these simple ingredients to build your Chocolate Raspberry Frozen Yogurt Pops, each playing a key role in delivering that creamy, chocolaty, and fruity harmony.
- 1 1/2 cups plain Greek yogurt: Creamy base that brings tanginess and a smooth, protein-packed texture.
- 1/4 cup honey: Natural sweetener that balances tartness and enhances flavor depth.
- 1 teaspoon vanilla extract: Aromatic note that highlights the yogurt’s creaminess and enriches the chocolate.
- 1/3 cup unsweetened cocoa powder: Deep, rich chocolate flavor without added sugar for a velvety swirl.
- 2 cups fresh raspberries: Bright, juicy fruit that adds vibrant color and sweet-tart bursts.
- 2 tablespoons granulated sugar: Sweetens the raspberry layer and helps create a thick, luscious puree.
How To Make Chocolate Raspberry Frozen Yogurt Pops
Let’s walk through the simple steps to transform these ingredients into vibrant, marbled popsicles. We’ll start by creating silky chocolate yogurt, then whip up a bright raspberry puree, and finally layer and swirl them in molds for that signature marbled look. With just a few bowls and molds, you’ll have a healthy dessert ready to freeze!
1. In a medium mixing bowl, whisk together the Greek yogurt, honey, and vanilla extract until the mixture is silky and free of lumps.
2. Sift the unsweetened cocoa powder over the yogurt blend to prevent clumps, then stir thoroughly until you have a smooth, chocolate-colored yogurt base.
3. In a clean bowl, place the fresh raspberries and granulated sugar. Mash them together with a fork or potato masher until you achieve a thick, juicy raspberry puree with visible fruit bits.
4. Layer the popsicles: Spoon a thin layer of chocolate yogurt into the bottom of each mold, top with a layer of raspberry puree, and continue alternating. Use a skewer or toothpick to gently swirl through the layers, creating a marbled pattern.
5. Place the popsicle sticks into each mold and freeze for a minimum of 4 hours (or overnight) until the pops are fully set and firm to the touch.
6. To unmold, briefly dip the bottoms of the molds into warm water for 5–10 seconds to loosen, then gently pull on each stick until the pops slide out cleanly.
Serving Suggestions
These Chocolate Raspberry Frozen Yogurt Pops are a breeze to serve at summer barbecues, weekend brunches, or an afternoon pick-me-up. Their vibrant swirls and refreshing flavors make them both a conversation piece and a healthy crowd pleaser. Whether you line them up on a tray or tuck them into decorative glasses, presentation elevates the experience. Grab a few creative serving ideas below to make your popsicles look and taste even more irresistible—your guests won’t believe these treats are this good for you!
- Serve them on ice-filled trays to keep the pops cold and add a touch of flair at outdoor gatherings.
- Garnish with a few fresh raspberries and a sprinkle of shaved dark chocolate for a gourmet twist.
- Pair the popsicles with a small bowl of granola or chopped nuts on the side for added crunch.
- Present them in decorative cups or mason jars with colorful straws for a playful dessert display.
Tips For Perfect Chocolate Raspberry Frozen Yogurt Pops
Frozen yogurt pops are forgiving, but little adjustments can elevate your Chocolate Raspberry Frozen Yogurt Pops from great to sublime. Using full-fat Greek yogurt adds richness and prevents icy textures. If fresh raspberries aren’t in season, thaw frozen raspberries and drain off any extra liquid so you still get a thick, vibrant puree. Feel free to tweak the sweetness by adjusting the honey and sugar to fit your palate—less for tart lovers or more for those with a sweet tooth. Once frozen, store your pops in a single layer inside an airtight container to keep them fresh and prevent freezer burn. Follow the tips below, and you’ll be well on your way to dreamy, marbled popsicles every time!
- For a richer texture use full-fat Greek yogurt.
- Frozen raspberries can be used; thaw and drain excess liquid before mashing.
- Adjust the sweetness by increasing or decreasing honey and sugar to taste.
- Store finished pops in an airtight container in the freezer for up to 2 weeks.
How To Store It
These Chocolate Raspberry Frozen Yogurt Pops are best enjoyed at peak freshness, so storing them correctly will preserve their creamy texture and swirled beauty. Avoid temperature fluctuations and freezer burn by using airtight methods and planning ahead for serving. Whether you’re prepping for a party or saving extras for later, the following storage tips will help your pops stay luscious, flavorful, and ice-crystal free. Read on to discover foolproof ways to lock in flavor and keep your pint-sized frozen treats looking as good as they taste.
- Layer your popsicles between parchment paper inside an airtight container to prevent them from sticking and to maintain texture.
- Store the container in the coldest part of your freezer (usually the back) to avoid temperature swings when opening the door.
- Label the container with the date, and consume within 2 weeks for the best taste and to avoid ice-crystal formation.
- If you plan to stack pops, place a sheet of wax or parchment paper between layers for easy separation.
Frequently Asked Questions
Got questions? We’ve got answers to help you nail these popsicles every time.
- How long does it take to prepare and freeze these Chocolate Raspberry Frozen Yogurt Pops?
Active preparation takes about 15 minutes—5 minutes to whisk the yogurt base, 5 minutes to sift and stir in cocoa powder, and 5 minutes to mash raspberries with sugar and layer the pops. Freezing requires at least 4 hours or until completely solid, so plan for about 4 hours and 15 minutes total.
- Can I use frozen raspberries instead of fresh ones?
Yes. Thaw frozen raspberries fully, then drain any excess liquid before mashing with sugar. Excess moisture can make the puree too thin and affect the marbling. After draining, proceed with the recipe as written for a thick, vibrant raspberry layer.
- How do I achieve a clear marbled effect in each popsicle?
Spoon a small layer of chocolate yogurt into the mold first, then a layer of raspberry puree. Repeat, using a skewer or toothpick to gently swirl through the layers just enough to create streaks—avoid overmixing or you’ll end up with a uniform brown color instead of marbling.
- What’s the best way to remove the pops from the molds without breaking them?
Remove the popsicle mold from the freezer and briefly dip the outside in warm tap water for about 5–10 seconds. This loosens the edges. Gently tug on each stick while keeping the mold tilted slightly upward until the pop slides out easily.
- How should I store any leftover pops to maintain peak flavor and texture?
Place finished pops in a single layer in an airtight freezer-safe container or resealable bag. Store in the back of the freezer (away from the door) for up to 2 weeks. For best texture, consume within 1 week to avoid ice crystals.
- Can I adjust the sweetness or use alternative sweeteners?
Absolutely. If you prefer less sweetness, reduce honey by 1–2 tablespoons or decrease granulated sugar by 1 tablespoon. You can swap honey for maple syrup 1:1. For a lower-glycemic option, use a sugar substitute like erythritol in place of sugar, adjusting to taste.
- Will using low-fat versus full-fat Greek yogurt affect the texture?
Yes. Full-fat yogurt yields a creamier, richer texture that resists ice crystal formation. Low-fat Greek yogurt still works but can produce a slightly icier pop. If using low-fat, consider adding 1–2 tablespoons of finely chopped nuts or shredded coconut for extra creaminess.
What Makes This Special
From the creamy Greek yogurt backbone to the swirling dance of rich cocoa and tangy raspberry, these Chocolate Raspberry Frozen Yogurt Pops hit the sweet spot between dessert and snack. The marbled effect isn’t just pretty—it ensures every bite delivers both chocolatey smoothness and puckering berry pop. Plus, customization is a cinch: swap sweeteners, try low-fat or full-fat yogurt, or add mix-ins to suit your mood. Best of all, they’re a breeze to prep and freezer-friendly—print this recipe, save it, and dive into your freezer whenever you need a cool pick-me-up. If you give them a whirl, let me know how they turned out or shoot over any questions!
Print
Chocolate Raspberry Frozen Yogurt Pops
- Prep Time: 15 mins
- Cook Time: 240 mins
- Total Time: 4 hours 15 minutes
- Yield: 6 servings
- Category: Desserts
Description
Silky chocolate yogurt layers swirl with jewel-like raspberry puree, creating popsicles that crackle with sweet-tart bursts and cold creaminess on each bite.
Ingredients
- 1 1/2 cups plain Greek yogurt
- 1/4 cup honey
- 1 teaspoon vanilla extract
- 1/3 cup unsweetened cocoa powder
- 2 cups fresh raspberries
- 2 tablespoons granulated sugar
Instructions
- In a medium bowl whisk together Greek yogurt, honey, and vanilla extract until smooth.
- Sift in unsweetened cocoa powder and stir until the chocolate yogurt mixture is evenly combined.
- In a separate bowl mash fresh raspberries with granulated sugar until a thick puree forms.
- Spoon a layer of chocolate yogurt into each popsicle mold, then add a layer of raspberry puree and repeat layers until molds are full, using a skewer to create a marbled effect.
- Insert popsicle sticks into the molds and freeze for at least 4 hours or until completely solid.
- To remove pops, dip molds briefly in warm water and gently pull on the sticks.
Notes
- For a richer texture use full-fat Greek yogurt.
- Frozen raspberries can be used; thaw and drain excess liquid before mashing.
- Adjust the sweetness by increasing or decreasing honey and sugar to taste.
- Store finished pops in an airtight container in the freezer for up to 2 weeks.