
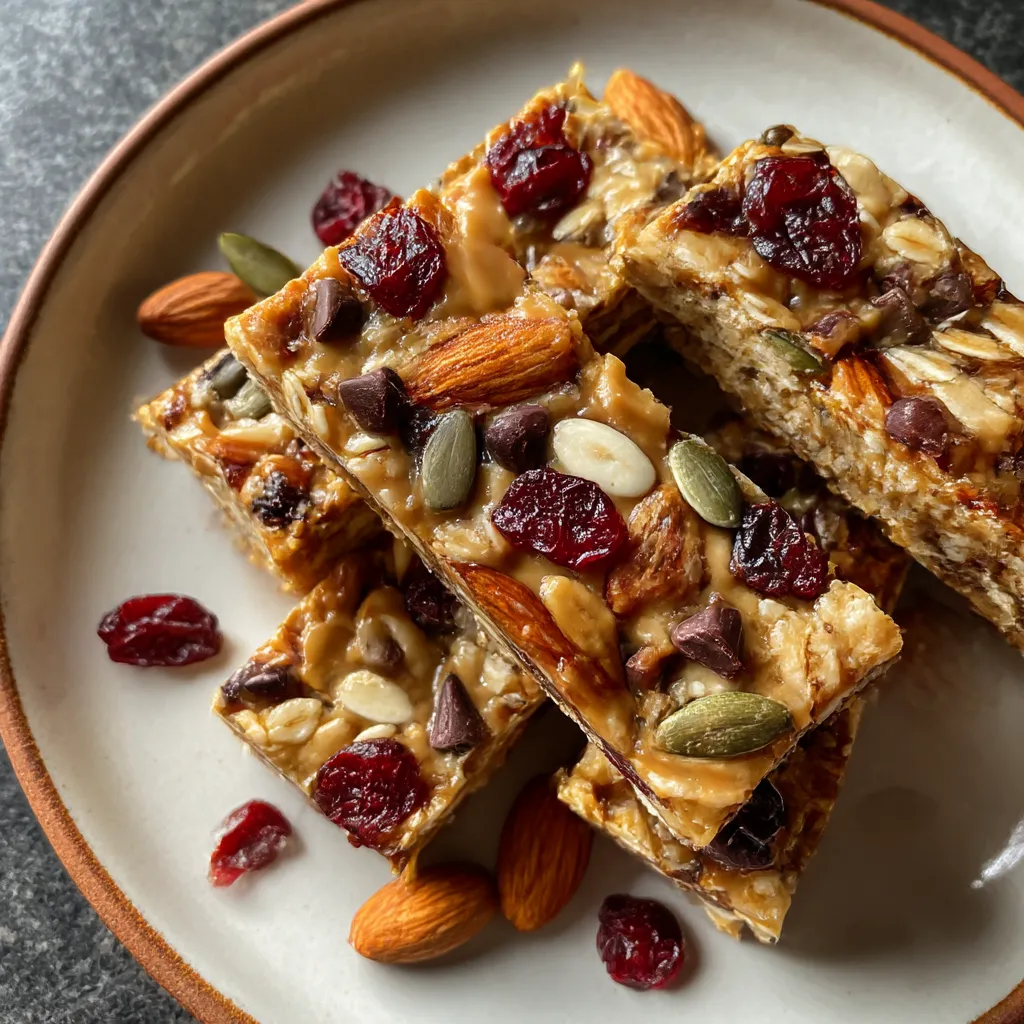
Healthy No-Bake Snack Bars deliver a perfect mash-up of chewy oats, crunchy nuts, and sweet honey for instant satisfaction. A crunchy, chewy crowd-pleaser packed with oats, nuts, seeds, and a touch of honey, these bars chill into perfect handheld treats studded with pumpkin seeds, dried cranberries, and mini dark chocolate chips. They come together in minutes, no oven required, making them ideal for busy mornings, afternoon pick-me-ups, or guilt-free dessert. Ready to fuel your day? Let’s dive in!
Key Ingredients
Start with a handful of wholesome staples that pack flavor, texture, and nutrition into every bite:
- 1 cup rolled oats: Provides a chewy base rich in fiber that holds the bars together.
- 1/2 cup chopped almonds: Adds crunchy texture and healthy fats to boost heart health.
- 1/2 cup chopped walnuts: Contributes earthy flavor and omega-3 fatty acids.
- 1/4 cup pumpkin seeds: Brings a subtle nutty crunch loaded with protein and minerals.
- 1/4 cup sunflower seeds: Offers extra crunch and vitamin E for skin health.
- 1/2 cup peanut butter: Acts as the creamy binder, delivering protein and that classic nutty taste.
- 1/3 cup honey: Sweetens naturally while helping the bars stick together.
- 1 teaspoon vanilla extract: Enhances all the other flavors with warm, aromatic notes.
- 1/4 teaspoon salt: Balances sweetness and amplifies the nutty undertones.
- 1/4 cup dried cranberries: Adds chewy bursts of tart sweetness in every bite.
- 2 tablespoons mini dark chocolate chips: Melts slightly into pockets of rich chocolate goodness.
How To Make Healthy No-Bake Snack Bars
No oven? No problem! These bars come together quickly with simple mixing, gentle warming, and a bit of chilling. You’ll start by preparing your pan and dry mix, then whisk a smooth peanut butter–honey blend before combining everything. A firm press and a short chill set everything into perfect bars you can slice and savor. Follow these steps to achieve evenly coated ingredients, well-bound bars, and hassle-free cleanup.
1. Line an 8×8-inch baking pan with parchment paper, leaving an overhang on two sides. This lets you easily lift the set bars out.
2. In a large bowl, combine rolled oats, chopped almonds, chopped walnuts, pumpkin seeds, sunflower seeds, and salt. Use a wide bowl for even mixing.
3. In a small saucepan over low heat, warm peanut butter and honey until smooth and combined, then stir in vanilla extract. Keep the heat gentle to prevent scorching.
4. Pour the warm peanut butter mixture over the dry ingredients and mix thoroughly until everything is evenly coated. A rubber spatula works best to fold everything together.
5. Fold in dried cranberries and mini dark chocolate chips, distributing them evenly without over-mixing.
6. Transfer the mixture to the prepared pan and press firmly into an even layer using the back of a spatula or clean hands to ensure the bars hold together.
7. Refrigerate for at least 2 hours or until the mixture is firm. This chilling time helps the bars set properly.
8. Use the parchment overhang to lift the set mixture from the pan, place on a cutting board, and slice into bars of your desired size.
Serving Suggestions
These bars shine as a versatile treat any time of day—whether you need a quick breakfast, a post-workout boost, or a guilt-free dessert. Their portability makes them perfect for lunchboxes, road trips, or office snack drawers. Here are some fun ways to serve them at their best:
- Wrapped in parchment for on-the-go convenience—cut individual bars and wrap them to keep them fresh and mess-free.
- Paired with Greek yogurt to add a creamy contrast; break a bar into chunks and stir into a bowl for a parfait-like treat.
- Alongside fresh fruit like apple slices or berries to add juiciness and extra vitamins to your snack plate.
- Drizzled with dark chocolate by warming a few extra chips and lightly coating the tops for an indulgent finish.
Tips For Perfect Healthy No-Bake Snack Bars
With just a few extra tricks, your Healthy No-Bake Snack Bars will turn out flawlessly each time—no more crumbling corners or sticky bottoms. These tips help you adapt the recipe to fit various dietary needs, prevent binding mishaps, and ensure every bite is both crunchy and chewy.
- Use almond butter or sunflower seed butter as an alternative to peanut butter.
- Swap honey for maple syrup to make the bars vegan-friendly.
- Store the bars in an airtight container in the refrigerator for up to one week.
- Press the mixture firmly to ensure the bars hold together without crumbling.
How To Store It
Storing your Healthy No-Bake Snack Bars correctly will maintain their flavor and texture, so you can grab them whenever hunger strikes. Whether you’re stashing them in the fridge or freezer, a little care goes a long way in preventing them from becoming too soft or too hard. Follow these storage methods to keep your bars tasting fresh and ready to enjoy:
- Refrigerator storage: Place bars in an airtight container and layer with parchment paper to prevent sticking; keeps fresh for up to one week.
- Freezer storage: Individually wrap bars in plastic wrap and seal them in a freezer bag; store for up to one month for quick pull-outs.
- Room temperature: If consuming within two days, keep bars in a cool, dry place in an airtight tin to preserve their chewiness.
- Vacuum sealing: Remove air from bags before freezing or refrigerating to extend shelf life and prevent freezer burn.
Frequently Asked Questions
Got questions about these snack bars? Here are answers to common queries to make your kitchen life easier:
- How long does it take to prepare these snack bars?
It takes about 15 minutes to chop the nuts, combine all ingredients, and press the mixture into the pan, plus at least 2 hours of refrigeration time for the bars to set firmly.
- Can I substitute almond butter or sunflower seed butter for peanut butter?
Yes, you can substitute almond butter or sunflower seed butter in a 1:1 ratio for peanut butter; just warm it gently with the honey (or maple syrup) so it coats the dry ingredients evenly.
- How do I make these bars vegan-friendly?
Replace the honey with an equal amount of maple syrup and use dairy-free dark chocolate chips to keep the binding and sweetness while ensuring the bars remain vegan.
- Are these snack bars gluten-free?
They can be gluten-free if you use certified gluten-free rolled oats and verify that all other ingredients, including seeds and dried fruit, are labeled gluten-free to avoid cross-contamination.
- How should I store the snack bars and how long will they stay fresh?
Store the bars in an airtight container in the refrigerator for up to one week. For longer storage, wrap individual bars in plastic wrap and freeze for up to one month.
- What should I do if my bars are too crumbly after cutting?
Make sure you press the mixture very firmly into the pan using the back of a spatula or clean hands, and confirm the peanut butter–honey mixture was fully warmed and smoothly combined to bind all ingredients well.
- Can I customize the mix-ins or adjust the flavor profile?
Yes, you can fold in extras like shredded coconut, chia seeds, or swap dried cranberries for raisins or chopped dates, but if you add more dry ingredients, increase the peanut butter or honey slightly to maintain proper binding.
What Makes This Special
These Healthy No-Bake Snack Bars hit the sweet spot between sweet and salty, chewy and crunchy, all without heating up your kitchen—a true snack-time superhero! Thanks to a blend of oats, nuts, seeds, and just the right drizzle of honey, each bar delivers lasting energy and smiles in every bite. Feel free to print this article, save it in your favorite recipe binder, or bookmark it for late-night cravings. Give these bars a whirl and drop a comment below with your custom twists or any questions—you might inspire my next kitchen experiment!
Print
Healthy No-Bake Snack Bars
- Prep Time: 15 mins
- Cook Time: 5 mins
- Total Time: 20 minutes
- Yield: 12 servings
- Category: Breakfast
Description
This no-bake snack bar combines chewy oats, crunchy nuts, and sweet honey for instant satisfaction. Studded with pumpkin seeds, cranberries, and dark chocolate chips, they firm up in minutes into perfect grab-and-go bites.
Ingredients
- 1 cup rolled oats
- 1/2 cup chopped almonds
- 1/2 cup chopped walnuts
- 1/4 cup pumpkin seeds
- 1/4 cup sunflower seeds
- 1/2 cup peanut butter
- 1/3 cup honey
- 1 teaspoon vanilla extract
- 1/4 teaspoon salt
- 1/4 cup dried cranberries
- 2 tablespoons mini dark chocolate chips
Instructions
- Line an 8×8-inch baking pan with parchment paper, leaving an overhang on two sides.
- In a large bowl, combine rolled oats, chopped almonds, chopped walnuts, pumpkin seeds, sunflower seeds, and salt.
- In a small saucepan over low heat, warm peanut butter and honey until smooth and combined, then stir in vanilla extract.
- Pour the warm peanut butter mixture over the dry ingredients and mix thoroughly until everything is evenly coated.
- Fold in dried cranberries and mini dark chocolate chips.
- Transfer the mixture to the prepared pan and press firmly into an even layer using the back of a spatula or clean hands.
- Refrigerate for at least 2 hours or until the mixture is firm.
- Use the parchment overhang to lift the set mixture from the pan, place on a cutting board, and slice into bars.
Notes
- Use almond butter or sunflower seed butter as an alternative to peanut butter.
- Swap honey for maple syrup to make the bars vegan-friendly.
- Store the bars in an airtight container in the refrigerator for up to one week.
- Press the mixture firmly to ensure the bars hold together without crumbling.